|
Jerry's Scope Page
The Oxbow Trail Observatory |
 Hope you enjoy the pics... |
|
Jerry's Scope Page
The Oxbow Trail Observatory |
 Hope you enjoy the pics... |
|
Thanks...to my fellow-astronomers for all
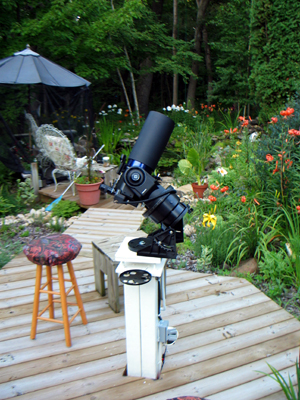
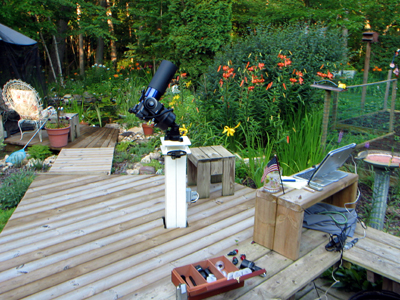
the guidance and assistance in my quest For my fellow amateur astronomers, I'll start with some pics of the telescope pier I built. It sure does save me some setup time when getting ready for a night of gazing. You know...there is nothing worse than losing your audience to boredom while you work at setting up the equipment. Everyone wants to see it NOW.
Only an astronomer appreciates (and enjoys) the
procedures. |
 The pier was built with ideas borrowed from designs found on Weasner's Mighty ETX Site. |
 It was constructed with four-4"x4"x8' treated wood posts. They were glued and clamped. The top was then sanded square. |
|
I notched each corner of the pier to allow clearance for the leveling nuts and bolts. Then, I attached the first 10"x10"x3/4" platform to the 7"x7"x8' pier with glue and lag bolts. I added a swing arm which will accommodate the lens holder. The second platform is supported by
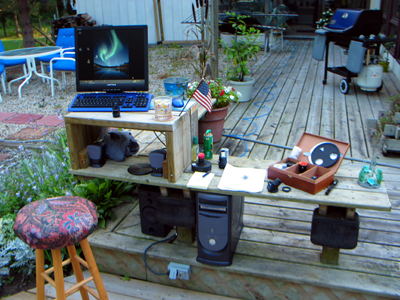
I installed electrical outlets on the pier and near the tablet pc stand. For the scope-to-computer connections, I ran telephone cable, AutoStar compatible RJ-45 cable, and active USB2 cable from the pier to the computer. Plugging everything in is very convenient.
So...when the enjoyable Summer Wisconsin weather goes south for the Winter, I have setup a cold-weather viewing workstation. The computer armoire is just inside the patio door closest to the telescope pier. It houses the computer, and two 19" LCDs. On one screen is the Starry night software, linked to the scope. The other screen is used for the display of the CCD astrophotography control software. I made a cable which is about 25 feet long, which connects the scope to the Autostar controller and the computer. I also use the Starry Night software to direct my scope. Now...I can do my initial setups outside, and sit INSIDE, where it is warm, to do the astrophotography. |
 Then...I started to dig the hole for it...and you just can't use a post hole digger in sandy soil to do a hole five feet deep either...smiles. So...SOME considerable time later...the pier is in the ground and surrounded with a few bags of cement. That pier is NOT going anywhere! I extended my deck to give me a nice working platform. The top of the pier is 33" above the top of the deck. I had also installed a small length of red rope lighting at the base of the pier, recessed below the deck, for some soft red lighting of the pier in the darkness.
This is a pic of the Meade wedge I now have installed. Now, I needed a flat surface to mount the wedge. I needed to add another plate to the top of the pier, since the top plate's carriage bolt heads would have interfered with the new top plate. I cut small indentions on the bottom of this new top plate...allowing the carriage bolt heads to recess into the new top plate. Then, I screwed, glued, and painted the new top plate. I re-leveled the new 1 1/2" thick top plate and attached the new mount...Sweet! The Pier has been in use now for over 15 years, and has only needed re-leveling twice. It's still as solid as it was the day it was installed.
My scope is a Meade ETX-125EC...I love it.
|
|
I had started using the Sky6 Serious Astronomer Edition Astronomy Software to control the scope, but have switched to Starry Night Pro Plus. Version 7 is new...and the features offered are quite superior to any astronomy software I have tried. Besides the ease of the scope and focuser controls, I especially like the full-sky CCD image used for displaying the sky. It really gives you a good feel for the actual view seen when you look up. Being in the middle of the woods makes for a pretty limited horizon. Starry Night allows me to create my own horizon. I took digital pictures...and with some Photoshop magic, I created this panorama, which is used by the software to display the actual horizon image within the software. Now I can always know what will be up...and visible... when planning a night out with the stars.
|
|
I used the holding rings from my purchased mount. I designed the mount to extend a little to the back of the scope, to allow for a small counterweight to help with balance. The new lower-profile mount is attached to the tripod mounting holes on the bottom of the scope. The green laser now has a good solid mount.
|
This is a green light laser pointer, purchased from Beam of Light Technologies. I chose their "tuned" model BTG-6 Plus and the optional remote switch. I bought a mount for the pointer from Lumicon. I had originally intended to simply attach it to my scope using the supplied "industrial-strength" double-sided tape provided...but was disappointed with the stability of the mounting. So, I used a 7"scrap piece of aluminum and drilled as needed.
The beam is very bright and excellent for aiming the scope...the beam is very bright...I'm sure the neighbors are wondering what I am doing over here with that green beam of light moving around the sky...smiles. And besides...It just looks Cool arcing across the sky while the scope is slewing...smiles.
|

Checklist for tonight's viewing:
|
So...once everything is setup and aligned, using the astronomy software, you can point to an object on the monitor with the mouse, and slew the scope to that object in the sky...Very nice and works very well!
So...I have upgraded the scope computer a tad
bit...again...smiles. I wanted to have more processing power and RAM to better
handle the scope control and image processing needed for the StarShoot
Deep-Space Color Imager and my new Planetary CCD camera. |
|
I had some nice nights for viewing and are getting some experience No new images to post soon...but here are some of my first ones... |
|
Well...thanks for stopping in...hope you found it all somewhat interesting... Oh...And this page background is Sagittarius...
And...thanks to Attilla Danko for writing
the script and including my site in And...These are some of my favorite Astronomy Links... Did I mention my new Business?
My websites: My Bottle Tree
Business My Computer Business My Telescope Hobby
(obsession) Page My Genealogy Page
|